January 29, 2015

Beetroot and Chocolate Cupcakes


Made these cupcakes for my daughter, who after wishing her cousin a Happy Birthday on a long distance call, wanted to know "Cake kahaan hai" [ Where is the Cake]. There were some beetroots lying in the fridge and I searched for a recipe for cupcakes using them. This recipe had the most positive comments , so decided to make these.  And it turned out really moist and utterly delicious. These cupcakes are not pink or red, but dark chocolate colour.

Recipe for cake is from  here . It makes about 20-22 regular sized cupcakes. These taste best after cooling for few hours or kept overnight refrigerated covered..

Ingredients

  • 250g well-drained, cooked beetroots, pureed
  • 1/2 teaspoon vanilla extract
  • 300g caster sugar
  • 250ml vegetable oil
  • 3 eggs
  • 225g plain flour
  • 1 1/2 teaspoons bicarbonate of soda
  • 1/4 teaspoon salt
  • 6 tablespoons unsweetened cocoa powder

Method 

  1. Preheat oven to 180 C / Gas 4. Grease and flour one 20x30cm (9x13 in) or similar sized baking tin.
  2. In a large bowl, combine pureed beetroots, eggs, vanilla, oil and sugar. Mix with an electric mixer on low speed until well combined.
  3. In a separate bowl, mix together flour, bicarbonate of soda, salt and cocoa. Add to the creamed mixture, beating together well. Pour batter into prepared tin.
  4. Bake for 25 to 30 minutes until done. Cool and frost with your favourite icing. 
I have frosted with chocolate ganache.

July 14, 2014

Another birthday cake!


While I was on the break from blogging , Had made this cake for my husband's birthday!

July 6, 2014

Birthday Cake


Hi Everyone,
It's been 2 long years since I blogged. Between office work and a 2 year toddler, I am increasing finding it difficult to get back to blogging and baking. However, not to miss the chance to bake a celebration birthday cake, I made this cake for my daughter's second birthday.
Recipe Source :  link

July 14, 2012

I am a mommy now !!!!

I am very happy to announce the arrival of Baby sinfoodie :)our cute princess is doing well. :) needless to say , I will be missing in action here for coming months.

May 22, 2012

My Birthday Cake in different shades of pink


It was my birthday last week and I had  planned to treat myself by making this pink layered cake. Even though it meant a lot of effort as I have a small oven and I had to bake each layer one at a time, I was super excited.  Now, buying a birthday cake has become a passe at my home, and my husband who hasn't ever baked  a cake before wanted to bake one for me. Little did he know how long I had been wanting to make this cake. He wanted me to have a relaxed birthday but I was so excited that I had forbade him to bake a cake for me. 


The recipe I have used is for a 6" cake for each of the 4 layers. On hindsight,I feel I should I have reduced the amount  or baked it in an 8" pan. I have used 2,4,8,12 units of rose pink liquid food color for the gradient layers. I first started with 4 and 12 units, and decided that depending on the outcome after baking, I would increase or decrease the amount of colour for the next layer. The cake design is inspired by Call me Cupcake, though the recipe did not work for me as I had to prepare the batter separately for each layer as my oven is small. Though,for my first layer I tried that recipe by reducing it proportionately, but the quantity was so less for one layer, that the outcome was bad. I had to discard it and start afresh with a different recipe of a vanilla cake from here.
For Frosting I used the whipped cream frosting recipe which I had earlier used for Tuxedo Cake. I used 1/3rd of the quantity  for frosting the 4 layer cake.

Pink Gradient Cake

Ingredients

For one layer of a 6" cake 

1 1/4 cups cake flour
1 1/4 teaspoons baking powder
1/2 teaspoon baking soda
1/2 teaspoon salt
2 eggs
3/4 cup sugar
1 1/2 teaspoons pure vanilla extract
1/2 cup oil (vegetable, canola or extra light olive oil)
1/2 cup buttermilk

Preparation

  1. Preheat oven to 350*F.
  2. Grease and flour the cake pan and line the bottom with parchment paper. 
  3.  In a medium bowl, add cake flour, baking powder, baking soda and salt.  Stir together with whisk, and set aside.
  4. In the bowl of an electric mixer, add eggs and beat 10-20 seconds.  Add sugar and continue to beat on medium speed about 30 seconds.  Add vanilla and oil, beat.
  5. Reduce mixer speed to low and slowly add about half of the flour mixture.  Add half of the buttermilk, then the rest of the flour and the rest of the buttermilk.  Add the food colour and Beat until just combined.  Scrape down the side of the bowl.  
  6. Pour batter into the cake pan
  7.  Bake for 30-40 minutes till the skewer comes clean.
  8. Let the cake cool completely. 
For making cake flour at home - Take one cup of all purpose flour and remove 2 tbsp from it. Replace the 2 tbsp flour with cornflour and sift together 2-3 times. Cake flour is ready to use.

Assembling

  1. Once you have all the layers ready and cooled,  keep the darkest layer at bottom and apply the frosting and place the next layer.
  2. Cover the entire cake with crumb coating and let it refrigerate for at least 30 minutes. 
  3. Apply the final coating of frosting with a design of your choice.


May 2, 2012

Outrageous Brownies


These delicious brownies by Ina Garten  are one of the most popular recipe available online. With 500 reviews and most of them positive , I had to make them. My friends were coming over this weekend , so I thought what better occasion than this .The brownie uses a lot of butter , so it can only be indulged in once in a long while. According to the reviews, these taste better when kept refrigerated overnight and should be served  after refrigeration only. Also, they cut better upon refrigeration. I have only made half the amount mentioned in the original recipe.

Outrageous Brownies

Ingredients

1/2 pound (2 sticks) unsalted butter
1/2 pound  plus 6 ounces semisweet chocolate chips, divided
3 ounces unsweetened chocolate
3 extra-large eggs
1.5 tablespoons instant coffee powder (I used 1 tbsp and it was sufficient)
1 tablespoon real vanilla extract
1 cup + 2 tablespoons granulated sugar
1/2 cup + 2 tablespoons all-purpose flour, divided
1½ teaspoons baking powder
1/2 teaspoon kosher salt
1.5 cups diced walnut pieces (I used 1 cup)

Preparation

  1. Preheat oven to 350 degrees. Grease and flour a 9×13 baking pan. (325 degrees if using a dark non-stick pan)
  2. Melt together the butter, chocolate chips[1/2 pound], and unsweetened chocolate on top of a double boiler (I did this step in a glass dish in the microwave at 30 second intervals). Cool slightly.
  3.  Stir together [Do not beat] the eggs, instant coffee, vanilla and sugar.
  4.  Stir in the warm chocolate mixture and cool to room temperature.
  5. Stir together the 1/2 cup flour, baking powder and salt.
  6.  Add to cooled chocolate mixture. 
  7. Toss the walnuts and 6 ounces chocolate chips with 2 tbsp flour to coat.Then add to the chocolate batter. Pour into prepared pan.
  8. Bake for about 30 minutes, or until tester just comes out clean. Halfway through the baking, rap the pan against the oven shelf to allow air to escape from between the pan and the brownie dough. Do not overbake.
  9.  Cool thoroughly, refrigerate well and cut into squares. Cut only after refrigeration. 
Recipe Source:Original Recipe:(Source: Ina Garten)  Half recipe by Brown eyed baker[Brown eyed baker]

April 4, 2012

Swedish Visiting cake


This one is the last one from  the baking bonanza I had while my sister was here. My other sister complains that all I send her are cookies, so this time I decided to parcel this simple tea cake for her. I can't say much about the taste , as I just tasted the crumbs :)) , but my sister called up to say that she loved it.  The recipe is simple and easy. The only issue was getting slivered almonds, which is not available here . Maybe it is available in some speciality store, but I haven't seen them yet. So, I did a bit of hard work in making these slivers from whole almonds.I don't have a pie pan or a 9"inch pan, so I divided the batter into a 6" pan and a tart pan. On hindsight, I should have reduced the baking time by few minutes since I divided the batter into smaller pans. The cake is supposed to be moist and it did lose some of it because of that. But , it didn't affect much.


Ingredients
1 cup sugar, plus extra for sprinkling
Grated zest of 1 lemon
2 large eggs
1/4 teaspoon salt
1 teaspoon pure vanilla extract
1/2 teaspoon pure almond extract
1 cup all-purpose flour
1 stick (8 tablespoons) unsalted butter, melted and cooled
About 1/4 cup sliced almonds (blanched or not)

Preparation
  1. Center a rack in the oven and preheat the oven to 350 degrees F.  Butter a seasoned 9-inch cast-iron skillet or other heavy ovenproof skillet, a 9-inch cake pan or even a pie pan.
  2. Pour the sugar into a medium bowl.  Add the zest and blend the zest and sugar together with your fingertips until the sugar is moist and aromatic.  \
  3. Whisk in the eggs one at a time until well blended. 
  4. Whisk in the salt and the extracts. 
  5. Switch to a rubber spatula and stir in the flour.  Finally, fold in the melted butter.
  6. Scrape the batter into the pan and smooth the top with a rubber spatula.  Scatter the sliced almonds over the top and sprinkle with a little sugar.  If you're using a cake or pie pan, place the pan on a baking sheet.
  7. Bake the cake for 25 to 30 minutes, or until it is golden and a little crisp on the outside; the inside will remain moist.  Remove the pan from the oven and let the cake cool for 5 minutes, t
  8. Then run a thin knife around the sides and bottom of the cake to loosen it. 
You can serve the cake warm or at room temperature, directly from the skillet or turned out onto a serving plate.
Recipe Source : Dorie Greenspan site


April 1, 2012

Dimpled Apple Cake


Apple cake is one of my favourite cakes, especially when flavoured generously with cinnamon. I had been craving for it for some time and would drag my husband to cafes just to have a piece of the apple cake. But as my luck would have it none of the cafes which earlier used to keep it, had it. So, finally I gave in to my temptation and baked this cake. I have baked apple cupcakes during my pre-blogging days and this time I wanted to try a recipe for moist cake .
The recipe I tried did have some problems, it took too long to bake and the people who had tried this recipe had listed those problems under the original blogger. But I reached the original blog only when I was almost done with the baking ,so I missed those tips.
In spite of the increased baking time, the cake turned out very delicious. It was a moody cake, tasted different every time I had it.  I liked it best when it was just out of oven, though it was difficult to cleanly slice it . I like my apple cake warm, but when I reheated it after storing it overnight, it didn't taste as good. Without heating, and just out of the refrigerator it again was very delicious and my sister and husband liked it more when it was cold. It also got cleanly sliced after being refrigerated overnight.
The best part of the cake was the crunchy cinnamon brown sugar streusel which also gave the cake sweet little dimples and hence the name.

Ingredients

For the Cake
1-1/2 cups Greek- yogurt, well-stirred [ I used homemade curd]
2/3 cup olive oil [ I used vegetable oil]
1/4 cup lemon juice
1 cup sugar
3 large eggs
1-1/2 teaspoons vanilla
4 small tart apples, such as Granny Smith, [ I used regular red apples]
2-1/2 cups all-purpose flour
2-1/2 teaspoons baking powder
3/4 teaspoon baking soda
1/2 teaspoon salt
Pinch freshly ground nutmeg
1/2 tsp powdered cinnamon

For the Cinnamon Streusel
2 teaspoons cinnamon
1/2 cup brown sugar
2 tablespoons unsalted butter, softened

Preparation
  1. Heat oven to 350 F/176 C. Generously grease a 9x13-inch baking pan with baking spray or olive oil.
  2. Whisk together yogurt, olive oil, lemon juice, sugar, eggs, and vanilla in a large bowl.
  3. Peel and core apples, and chop into chunks about 1/2-inch across. You should end up with 3-1/2 to 4 cups of apples. Stir chopped apple into the liquid ingredients.
  4. Add flour, baking powder, baking soda, salt, nutmeg, and 1/2 teaspoon cinnamon right into the liquids and stir just until no lumps remain.
  5. For the cinnamon streusel : In a small separate bowl, mix remaining 2 teaspoons cinnamon with the brown sugar and butter.
  6. Pour half of batter into prepared pan. Cover with half of cinnamon-brown sugar mixture, dropping it on batter in small lumps. Cover with remaining cake batter, then top with last half of cinnamon-brown sugar mixture.
  7.  Bake for 45 to 55 minutes, covering with foil if top gets too brown. When a tester comes out clean, transfer pan to a cooling rack and let it sit for at least  15 minutes before cutting.
Now the problems that were encountered by others and me.
  • Baking time: In my case It took 30 minutes more for tester to come clean. The original blogger attributes that this could be if the yogurt was liquidy and she suggest draining. My curd was liquidy and as I said before I reached the original blog only after I finished baking. Since I had to increase the baking time, I covered it with foil to avoid too much browning. The browning was perfect once I did so.
  • Slicing Difficulty: I still had the difficulty in slicing after having left it for more than hour. It sliced clean  only after refrigerating. 
  • The photo is of the next day , so you can see that I didn't face the issue of cake turning like a bread pudding  which some other users faced.
  • Some users suggested cutting olive oil  I didn't face any issues with vegetable oil.

March 30, 2012

Chocolate Cake with Chocolate Collar


I had been wanting to try my hand at the chocolate collar after recently noticing several birthday cakes in the cake shops having them. Chocolate decorations was the other thing I had been postponing trying.  So, when my sister came visiting from Delhi just few days after her birthday, it gave me a perfect opportunity to bake a belated birthday cake for her and at the same time try my hand at chocolate decorations. For the cake, I again used the same recipe as the  Tuxedo Cake which is currently my favorite chocolate cake base.I kept it simple this time with just 2 layers of cake with the sides and the insides filled with chocolate coffee ganache.

It was unfortunately a very hot Sunday in Mumbai when I made this chocolate collar, so the chocolate took a lot of time setting up. I tried to hasten the process by keeping it in the refrigerator for 30 secs which was a bad idea as the chocolate hardened in that short time. I had to apply a thin layer of melted chocolate to make it stick around the cake. Thankfully, it was not that hard that it couldn't take the round shape of the cake.

I am just sharing the recipe of how to make the collar, for the cake recipe, you can refer to Tuxedo Cake.

Ingredients

Cake, frosted and assembled.
White chocolate [ For making patterns, decorations]
Dark/milk chocolate
Parchment paper.

Method
Measure the Cake :
Determine the height and circumference of the cake. This needs to be done after the cake has been frosted , as frosting will increase both of them and we don't want our chocolate collar to fall short.

  1. The height can be measured with a ruler/scale . You can either keep the height of the cake same as that of cake or add some more centimeters if you want to cover your cake with fruit toppings. 
  2. The circumference can be measured using a thread/yarn.Wrap the thread loosely around the base of the cake and add an additional inch to ensure that there are no gaps when you wrap it around. 

Cut the Parchment Paper: 
As per the measurement , cut the parchment paper.

Make Chocolate Collar and Wrap around the cake

  1. Melt both the chocolates separately. 
  2. Fill the melted white chocolate in a piping bag and cut a small tip. 
  3. Place the parchment paper on your work surface. Make a pattern with the white chocolate. Since this was my first time at chocolate decoration too, I used the simplest zigzag pattern.
  4. Once the white chocolate is set completely, apply the dark chocolate over the entire parchment paper using an offset spatula.Spread evenly.
  5. Leave the chocolate collar to set, so that it is sticky/pliant and is  not fully hard/brittle. This is the step where the Mumbai weather played a spoilsport.
  6. Pick up the band and carefully put one end on the cake and press it to the frosting, wrapping it around the cake.
  7. Transfer it to the refrigerator for  30 mins to get it completely set. Once it is set, peel the parchment paper. It comes off easily :)


February 5, 2012

Carrot Cupcakes with Cream Cheese Frosting


I haven't blogged in a month and I haven't baked anything too since Christmas. I had made these Carrot Cupcakes during Christmas for my husband's colleagues and have been procrastinating since then to blog about it. The cupcakes turned out delicious and the feedback was great. Since I got to taste only a bite of it, I think maybe I should bake them again till the fresh red carrots are in market. 
The cupcake recipe is from here and for the frosting  I have modified the recipe which I used for Red Velvet Cupcake , by excluding White Chocolate. It tastes equally good. I remember, I had to use white chocolate then,as the cream cheese tasted sour, so white chocolate balanced the taste. The brand was different and now I stick to Philadelphia Cream cheese, which doesn't have a sour taste.
Ingredients
Makes 24 cupcakes
For Cupcake
2 cups all purpose flour
2 teaspoons baking soda
1 teaspoon salt
2 teaspoons ground cinnamon
1/2 teaspoon ground nutmeg
1 teaspoon ground ginger [ I didn't use it]
2 cups sugar
1 1/4 cups canola oil
4 large eggs
3 cups grated peeled carrots
1 cups coarsely chopped walnuts (optional)
1/2 cup raisins (optional)


For Cream Cheese Frosting
4 oz cream cheese
2 1/2 tbsp butter
1 tsp vanilla extract
1 1/4 cup icing sugar sifted

Preparation

For the Cupcake
  1. Preheat oven to 350 F/177C. Line 24 cupcake molds with paper liners, or butter and flour them.
  2. Whisk flour, baking soda, salt, cinnamon, nutmeg and ginger in medium bowl to blend.
  3. Whisk sugar and oil in large bowl until well blended. 
  4. Whisk in eggs 1 at a time. 
  5. Add flour mixture and stir until blended. 
  6. Stir in carrots, walnuts and raisins, if using them. 
  7. Divide batter among cupcake molds, filling 3/4 of each.
  8. Bake cupcakes 14 to 18 minutes, or until a tester inserted into the center of one comes out clean. Let cool in pan for five minutes or so, then transfer cakes to a cooling rack.
  9. Let cool completely before icing them.
For the Cream Cheese Frosting
  1. Beat Cream cheese and butter till light
  2. Add vanilla extract
  3. Add icing sugar and beat till smooth.

January 4, 2012

Chole Bhature


After a long time there is savory recipe on the blog and that too is not cooked by me, but by my dear husband.  And this time, It is my fault that I didn't put it up earlier, though it was made during Diwali. My husband mostly cooks non-vegetarian food and I am the one who cooks the vegetarian . This time, he decided to give me a full day break and I was not even allowed to enter the kitchen. It was a blessing, as I was already very tired making Diwali sweets. Though I have only put the Coconut Pistachio laddus on the blog, I had also prepared Churma Ladoo and Kalakand. I decided not to put these recipes on the blog, as Churma ladoo though very delicious, was very tiresome to make. And I don't want anyone to go through that ordeal : -D . And the Kalakand didn't turn as good as it is available in market. Maybe , I will try a different recipe for it and then post.

The Chole Bhature came out very delicious and everyone loved it. Usually the Bhature are very  heavy and oily and you can't eat more than one .These were one of the best Bhature I had, light and not oily at all.


Ingredients 

For the Chole :

250 Gm Chickpeas (Chole/Kabuli Chana)
1 teabag ( this is used to give the black color)
4-6 Big Black Cardamom (Badi Ilaichi)
Salt acording to taste
1 tsp Black Salt
3-4 Green Chilies  finely chopped
1 piece Ginger finely chopped
2-3 Tomatoes  finely chopped
2-3 tsp Coriander Leaves  finely chopped
1 Onion  finely chopped
1/2 tsp Mango powder (aamchur)
1 Tbsp Garam Masala
Red Chillies accoding to taste
2 tsp dry Coriander Powder (Dhania powder)
oil to cook
2  Bay Leaves
2 tsp Chole masala

For the Bhature:


2 cups All purpose flour (Maida)
1 cup curd/yogurt
Vegetable oil to fry
1 tsp salt
1 tsp baking soda


Preparation

For the Chole:
  1. Soak chickpeas overnight.
  2. Add  Chickpeas along with salt and teabag in the cooker .Add enough water. Cook it in a pressure cooker till  3-4 whistles. Do not over cook. The tea bag gives it the black color.
  3. Drain the  Chickpeas and do not throw the water. It will be used later.
  4. Heat oil in the pan .Add bay leaves,Cardamom. 
  5. When they crackle, add ginger,green chilies and onion. When onion is light brown, add tomato and  coriander powder,chilli powder garam masala.
  6. Add  Chickpeas and mix well for 2-3 minutes, Then add chole masala, amchur and ginger and black salt.
  7. Add the water in which Chickpeas was cooked and cook it for 10 minutes
  8. Mash some chickpeas , it will make the gravy thicker.
  9. Before Serving you can add some butter or ghee and  garnish with Coriander Leaves /Paneer Cubes

For the Bhature:

  1. In a large bowl ,mix salt, baking soda and all purpose flour.Add 2 tsp oil and mix it well. 
  2. Knead a soft dough using Curd/Yogurt.
  3. Cover the dough with a wet cloth and let it ferment for around 7-8 hours.
  4. Heat oil in  a deep pan. 
  5. Divide dough into 12 equal parts. Roll it in a thick round or oval shape.
  6. Deep fry till it is slightly brown .
  7. Serve hot with Chole,onion rings salad, sliced lemon and some pickles/achaar :)
Recipe Source: Adapted from CookHealthy

December 23, 2011

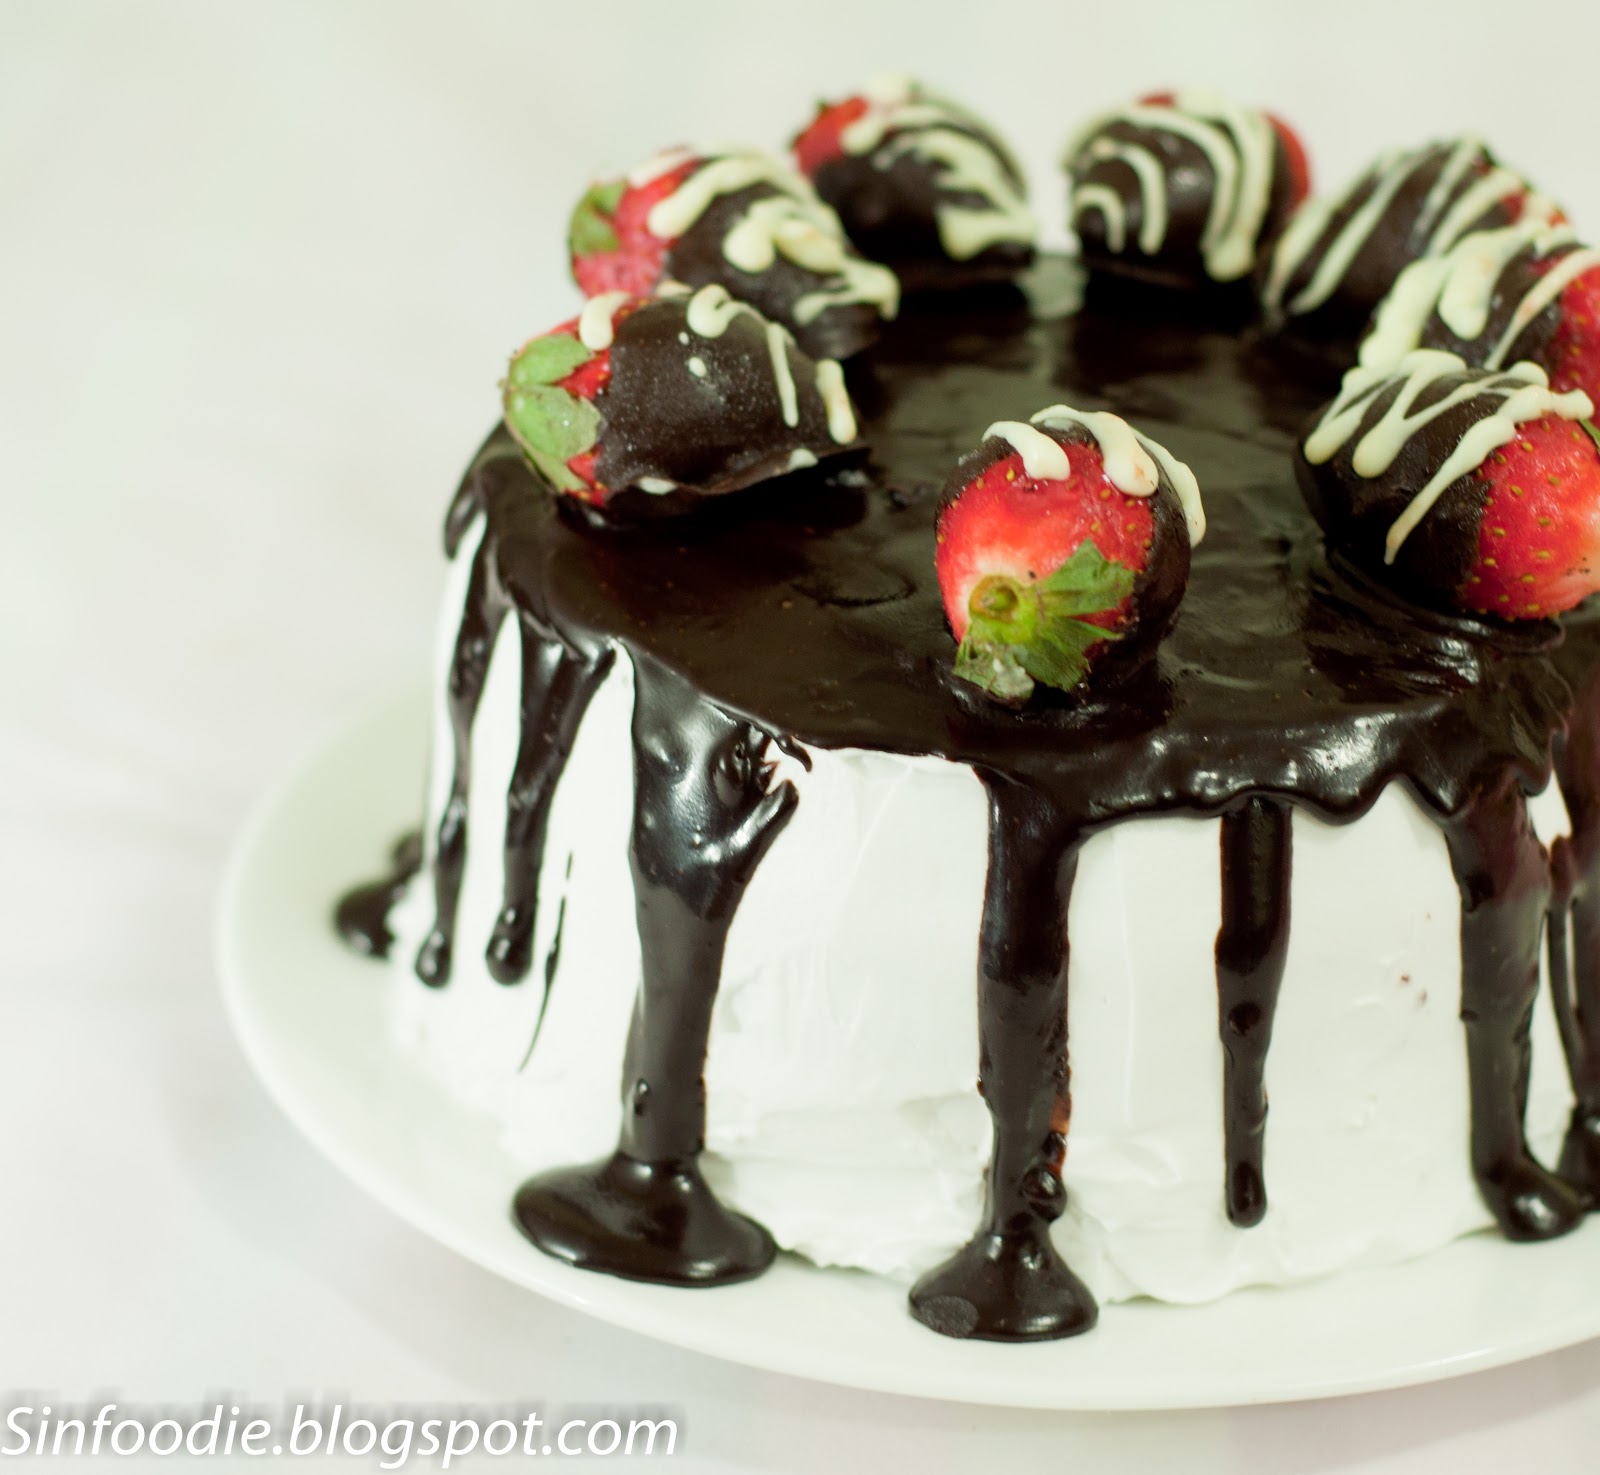
A Special Cake for the Special Man - Tuxedo Cake


I  drool every time I look at this gorgeous cake  which I made last week, a special cake for the special man's birthday !! I get very few occasions to bake a celebration cake and usually I spend a lot of time searching and finalizing the cake to bake. I don't know how I came across this one, but one look and it was decided. With so little experience in baking cakes, I was not sure If I could replicate it exactly, But I am really proud the way it has turned out. Quite Close !!  I was working with the whipped cream too for the first time, so the fear was manifold. The whipping did give me lot of troubles, muscle aches, and the quantity went wrong and I had plenty of whipped cream left, but no complains after the way it looked and tasted :-)  Since the birthday was falling on a week day, I planned to make it over two days. The first day I made the cake, and the 2nd day I did the whipping and assembling.

By the way hidden besides all this whiteness is 4 layers of moist dark chocolate cake. And is called a Tuxedo Cake.

I am sharing the original recipe here though I made it by halving it. That gave me two 6" cakes, which I sliced into four , making it a 4 layered cake. As I mentioned above the quantity of whipped cream didn't work for me. I had halved the recipe for it too, but plenty was left, so I think 1/4th would have been enough . I also didn't have the corn syrup, so I made the ganache which I have earlier used in Bundt Cake.
I am also sharing the chocolate dipped strawberries recipe.

Ingredients:


For the cake:
1 cup (2 sticks) unsalted butter
2 cups water
1 cup canola oil
4 cups sugar
1 cup unsweetened cocoa powder
4 cups all-purpose flour
4 large eggs
1 cup buttermilk
1 tbsp. baking soda
½ tsp. salt
1 tbsp. vanilla extract

For the frosting:
4 cups chilled heavy whipping cream
1¼ cups confectioners' sugar, sifted


For the Chocolate Strawberries:
10 even sized strawberries, washed and pat dried
3 oz. dark chocolate, finely chopped
some white chocolate


For the chocolate glaze:
4 oz. bittersweet chocolate, finely chopped
½ cup heavy whipping cream
¼ cup light corn syrup
2 tsp. vanilla extract

Preparation


For the Cake

  1. Preheat the oven to 350˚ F.  Line three 9-inch round cake pans (or two 10-inch round cake pans) with parchment paper.  Butter and flour the inside edges of the pan, shaking out the excess flour.  
  2. In a saucepan over medium heat, combine the butter, water and canola oil; heat until the butter is melted
  3. In a large mixing bowl, combine the sugar, cocoa powder, and flour; whisk to blend.
  4. Pour the melted butter mixture into the dry ingredients and whisk until smooth.
  5. Whisk in the eggs one at a time, then whisk in the buttermilk.  Add the baking soda, salt and vanilla to the bowl and whisk just until incorporated.
  6.  Divide the batter evenly between the prepared pans.  Bake for 35-40 minutes or until a toothpick inserted in the center comes out clean.
  7. Let cool in the pans for 15 minutes.  Run a knife around the edge of each cake layer and invert onto a wire cooling rack.  Allow the cake layers to cool completely before frosting, at least 2 hours.

For the frosting

  1.  Ensure that the bowl and the whisk of the electric mixer are chilled. This is for ensure the cream whips well.
  2. Add the heavy cream to the bowl of an electric mixer fitted with a whisk attachment.  Whip on medium-high speed until soft peaks form.  Add the powdered sugar and continue to whip until thoroughly combined and stiff peaks form.  Be careful not to over-beat!

Assembling the cake
  1. Place one cake layer on a cake platter and spread a layer of the whipped cream frosting over the top.  Top with a second cake layer, more frosting (and the third cake layer, if using).  Frost the top and sides of the assembled cake.  Refrigerate until the frosting has stabilized, at least 1 hour.
For the Chocolate Strawberries:
  1. Line a baking sheet with parchment paper. 
  2. Melt the dark chocolate and stir it smooth. 
  3. Hold the strawberries by stem and twist and swirl it in the melted chocolate.Take it out ,swirl and let excess chocolate drip. Place it on the parchment paper and refrigerate for 10-15 minutes for the chocolate to set
  4. When the chocolate strawberries is set, melt white chocolate in a bowl. Put it in a piping bag. Cut the tip and make patterns over the strawberries
For the chocolate glaze:

  1. Place the chocolate in a medium bowl.
  2. Heat the cream in a small saucepan over medium heat until simmering.  Pour the hot cream over the chocolate and let sit 1-2 minutes.
  3. Whisk until the mixture is smooth and homogeneous.  Blend in the corn syrup and vanilla.  Pour the glaze into a pitcher or measuring cup and let cool for 10 minutes.  (Do not let the glaze cool longer or it may become difficult to pour over the cake.)  
  4. Slowly pour the glaze over the cake, ensuring that the top is covered and the glaze drips over the sides.
  5. Place the chocolate dipped strawberries on the glaze immediately
  6. Refrigerate the cake until the glaze is set and the whipped cream frosting is firm, at least 1 hour.  
  7. For Serving Slice with a long, sharp knife, wiping the blade clean between slices.  
The Recipe is from Pastry Queen and Annie Eats. The chocolate strawberries is from numerous resources available on the web.


December 6, 2011

Coconut Pistachio Laddus


 No excuses for being invisible for so long on the blog. You know me and my frequent  absenteeism due to laziness well now :))  I had made these coconut laddus for Diwali.  It is a fairly simple recipe and very delicious. I anyway love coconut sweets and had been wanting to make them  and was very ecstatic when everyone who had them loved it.
I made two versions. The second photo is the one which is light pink [not peach] in colour. The 2nd photo doesn't look great in comparison with the first photo ,but it looked better than the first to the naked eyes. The only difference is the amount of beetroot used. For the first one I used an entire medium beetroot. And for the 2nd one ,I used half the beetroot.Now coming to the recipe, It is adapted from Alpana's blog.


Ingredients:
[For 15 laddus]

For The Pistachio Filling :
1/2 cup blanched, deskinned and coarsely ground Pistachios
1 tablespoon Sweetened condensed milk
Pinch of cardamom powder


For Coconut balls
1 cup desiccated coconut  + 1/2 cup for rolling the ladoos
200 Grams sweetened condensed milk ,half tin
1 cup Milk 
1 tsp Ghee/ Clarified butter
1 tsp cardamom powder
3-4 slices of fresh medium Beetroot [ light pink] or 1 medium beetroot [dark pink]


Preparation


For the Pistachio Filling:

  1. Mix  all ingredients under the Pistachio filling to make a dough. Make 15 small balls and keep aside.


For the Coconut Balls:

  1. Heat 1 tsp of ghee in a heavy bottomed pan. Add the desiccated coconut and stir for 2-3 minutes till the time you can smell the fragrance of the coconut. 
  2. Add milk & beetroot slices and stir till the milk is all absorbed in the coconut.
  3. Add condensed milk & cardamom powder & stir continuously on low heat till the mixture starts to leave the sides of the pan . 
  4. Switch off the heat  as soon as the mixture leaves the sides of the pan. Let this mixture cool for 10-15 minutes .  
  5. Remove the beetroot slices and mix well so that color is evenly spread. When the mixture cools off divide 15 equal portions . 
  6. Flatten each Coconut ball in your palms. Place one pistachio ball into the center and close it from all sides and shape it into round balls. 
  7. Take the 1/2 cup dry desiccated coconut and roll these balls in it .
  8. Refrigerate it before serving as they taste best after it. You can store them in refrigerator for 1 week.


October 20, 2011

Makhane ki kheer /Foxnut Seeds Pudding


Makhane ki Kheer is another variety of Indian kheer/Pudding. It is fairly popular and is usually made during fasting as Makhana is considered as an auspicious ingredient in offerings to the Lord during festivals.

Makhana/Foxnut seeds is often called as Lotus seeds. I am not sure whether it is correct as Wiki says that Makhana is from water lily and not  Lotus.  A less known fact is that around 90% of the world's total Makhana production comes from Bihar.[reference]


Ingredients
[For 3 people]

50 gms Makhana /Foxnut Seeds
2 tsp Ghee /Clarified Butter
1 litre milk [ I use toned]
2-4 tbsp Sugar  [  I like my kheer less sweet, had added only 2tbsp]
Kesar/Saffron, few strands
3 cardamom, powdered
1  & 1/2 tbsp charoli/chironji
1 tbsp chopped pistcachios
Pistachios/ Almonds for garnishing

Preparation

  1. Heat the ghee in a pan  and saute Makahanas for 4-5 minutes till they are crisp. Keep aside and once it is cool enough, crush them coarsely.
  2. Soak saffron strands  in 1 tbsp warm milk
  3. Heat milk in a heavy bottomed pan. Add saffron milk and boil the milk on low heat till it reduces to almost half the amount. Keep stirring in between to prevent burning.
  4. Add the crushed makhanas and simmer for about 10-15 minutes on low heat. The milk should be thick  and runny, and not dried. You can reduce the simmer time, if you feel that the milk is drying up.
  5. Add the charoli/chironji ,sugar,cardamom powder and pistachio and mix well. Keep on heat for 2-3 minutes more.
  6. Remove from heat, and garnish with the pistachios, almonds and serve it cooled.

October 18, 2011

Something for Diwali - Moong Dal Ladoo


It is Diwali time, and I should be making sweets. But, I don't know what has got into me, suddenly I don't feel like having anything sweet. Must be due to eating excess of gond  ladoos that a relative brought few weeks back.  My brother who is in town for couple of months, has an equally sweet tooth as mine,maybe a bit more. So, I thought of making these quickfix ladoos for him. Looking at how easy and quick they are to make , I  will make them again for Diwali.  It must have been decades since I tried binding the ladoos . Had forgotten how difficult it is to deal with the warm mixture :-) Anyone, any suggestions  for reducing the burning in hands?

Ingredients

The recipe is from here
(makes 12 ,size as in the photo)
1 cup yellow moong dal (split green gram-husk removed)
3/4 cup sugar , powdered ( it was a bit sweet, can reduce few tbsp)
3-4 cardamoms, peeled and powdered
8-10 chopped cashews,
10-12 tsp ghee/clarified butter

Preparation

  1. Toast moong dal in a wide pan on low heat till it has a uniform reddish brown color. Remove from heat and spread on a plate to cool.
  2. Heat a teaspoon of ghee and saute cashews until light brown. Keep aside.
  3. When the moong dal cools, grind it to a fine powder and mix with cashews, sugar and cardamom powder.
  4. Heat about ten teaspoons of ghee in a wide pan. Add dal/sugar mixture and stir until well combined. 
  5. Remove from heat and shape into lemon sized balls when the mixture is still warm.
  6. In case the mixture cannot be easily shaped. ,add teaspoons of hot ghee gradually.


October 17, 2011

A day at MasterChef India Kitchen

Photo Courtesy : via @starplus_indya
 
When Indiblogger announced it's blogger meet at the MasterChef India Kitchen, I was one of the first ones to register. Which food blogger in right mind would miss such an opportunity. I have always been wary of going to the actual Masterchef auditions, though my friends keep encouraging me and they have more belief in me than I have in myself :) .
This meet at the Masterchef Kitchen was something I didn't need to fear . I didn't know what to expect and when my husband asked me if he could pick me up in the evening from the venue, I told him most probably I would leave midway,so he didn't need to come. And how wrong I was !! Just as I entered the sets, I had a huge smile, I was so happy to be there and at the same time repenting why I didn't bring a camera.  I had to do with my cellphone camera, so the photo quality is going to be bad :-( . The few good photos I have borrowed from @starplus_indya tweets. 

The event began with blogger introductions.There were bloggers from all fields , the geeks and the techies, personal ,fashion, photography and ofcourse few food bloggers too. 
Photo Courtesy : via @starplus_indya
Then it was time for Masterchef Judges introduction. We are already familiar with Chef Ajay Chopra and Kunal Kapoor , who were the judges in the last season too. I was eagerly waiting for Chef Vikas Khanna , I had read many tweets gushing about his good looks.  But more than good looks, I was surprised to find how humble and down to earth he was, and he has such a cute punjabi accented Hindi :-). His restaurant Junoon has recently won a Michelin Star . During a group interaction, I was even more impressed when he told us that he was opening his next restaurant in Bodhgaya in Bihar [my home state]  due to spiritual reasons . It didn't make sense initially.Only later , did I come to know about his series of documentaries Holy Kitchens about his journey to discover the spiritual foods in the World's Holy Kitchens.


 Here are some photos from the event. 

 MasterChef Kitchen with the Clock always hanging on the head


The Plates and Cutlery Section  : A food blogger only knows the values of these.

Photo Courtesy : via @starplus_indya


Masterchef's table and the oven I  . I wish I had this oven !

The judges tasting section


The mystery box. The bloggers had to conceptualize a recipe  based on the mystery ingredients in 1 minute. By the time I reached my table back after looking at the ingredients, that one minute was already over  so I could only write 2 lines  :D 

Before beginning the skills challenge,Chef Ajay Chopra giving a Masterclass : How to dice a perfect 1cm*1cm apple square. Chef Kunal Kapoor showed us how to cut ginger julienne . And Chef Vikas Khanna showed us how to cut potatoes for french fries.


Few lucky bloggers got a chance to participate in the skills challenge. The winner got Rs 5K shopperstop voucher. And there was one lucky blogger who got 10K as his french fries were perfect!

And that was not the end of it. Each blogger got a masterchef apron.I got one more for being a food blogger. masterchef thermal mugs, and an indiblogger t-shirt! I made few friends , Sharmila, a personal blogger, Sindhi Rasoi, a food blogger and Mariam Dholkawala, a tech blogger. Sharmila was very kind to drop me off midway and I almost told her all my history & geography in the very first meeting which  is very unusual of me :) :)

It was a lifetime experience and thanks to Indiblogger team to give us this opportunity .Kudos to the Indiblogger team for organizing such an outstanding event.

October 16, 2011

eBook - 100 Yummy Diwali Recipes is Available for Free Download Now


The E-Book by IndusLadies for 100 Diwali Recipes is available for Free Download. My Pistachio and White Chocolate Burfi has made it to the E-book. It is on Pg 109.
You can dowload the free e-book from here.

Have a sweet Diwali !!

October 11, 2011

BBC GoodFood India Launch and a Chance to Win a trip to Italy


The good news for all food lovers in India is that BBC GoodFood is launching their Indian edition on 22nd October 2011. BBC GoodFood is a magazine internationally famous for its devotion to fine dining.
The magazine comes with great recipes for home cooking, and entertaining. Their triple-tested handpicked recipes make the magazine a must have for every kitchen. Each recipe is also paired with great food photos. Each issue also reveals culinary secrets from Internationally renowned chefs., BBC GoodFood India also comes packed with restaurant reviews and news on India’s dining scene. For the globe-trotting food-lover, they have recommendations for eating well across the world.

As India’s first international food magazine, BBC GoodFood have introduced the GoodFood survey to decode how India eats. TheGoodFood survey has been at the forefront of gauging the dining habits of food-lovers around the world, and is now keen to replicate the same in India.

The survey comes with the promise of great rewards – one lucky participant stands to win a culinary holiday to the Fontanafredda vineyards in Italy. Other prizes include a gift pack containing a voucher for two for a great dining experience at any of three fabulous restaurants in Mumbai, Delhi and Bangalore - Olive Bar & Kitchen, Manchester United Café and Aromas of China.


Don't miss the chance to win these awards. Take the survey at http://goodfoodsurvey.in
And Get ready to get your first copy of the Indian edition this October !
To know more about BBC GoodFood and the GoodFood survey please visit:
http://www.bbcgoodfood.com
http://www.facebook.com/BBCGoodFoodIndia
http://goodfoodsurvey.in


October 6, 2011

100 Yummy Diwali Sweets Recipes - Ebook By Indus Ladies

Indusladies.com is the largest online community for Indian Women.It has verious forums and communities about family and relationships, marraiage and spouses,kitchen and household, beauty and fashion, health, diet and fitness etc.
 
For the upcoming Diwali on October 26th, 2011, Indusladies are compiling an E-Book called “100 Yummy Diwali Sweet Recipes”. They are collecting sweet/dessert recipes from various bloggers to be featured in this E-Book.   You can submit your blogpost too before Oct 8th. The details are here on 100 Yummy Diwali Sweet Recipes


I am sending my Pistachio and White Chocolate Burfi Recipe for the E-Book.


If you are interested in making some other Indian sweets from my blog, here are some of them.

Lauki Halwa 


Parwal ki mithai


Cream Chop


September 30, 2011

Sugar Cookies for someone special


This was my first attempt at sugar cookies, and first attempt at decorating them too..and tasting them too. :-) I have learned how common they are in other parts of world, now that I have started baking so frequently. This was the second kind of cookie that I parceled to my friend, chosen again due to its crispiness and ability to last longer. The recipe was again from Dorie Greenspan's Baking: From my home to yours" and this time I faced more troubles than with Chocolate almond biscotti. But this time the fault was mine. I had halved the recipe and assumed that the small size eggs will be half of the "large sized eggs". The dough became unmanageable because of that. But thankfully it didn't impact the taste or texture. The only thing I had to do was to refrigerate for more than 2 hours, so that i could work with the dough.
I decorated the cookies with home-colored  sugar, which gives it a nice crunch. For next time, I am thinking of adding either spices or citrus zest to give them some additional flavour.

Here is the original recipe from the book.

Ingredients
2 cups all-purpose flour
1/2 teaspoon salt
1/2 teaspoon baking powder
1 stick plus 2 tablespoons (10 tablespoons) unsalted butter, at room temperature
1 cup sugar
1 large egg
1 large egg yolk
1 teaspoon pure vanilla extract

Colored sugar/cinnamon sugar [optional]

  Preparation
  1. Whisk the flour, salt and baking powder together.
  2. Working with  mixer, beat the butter at medium speed for a minute or so, until smooth. Beat in the sugar and continue to beat for about 2 minutes, until the mixture is light and pale. Add the egg and yolk and beat for another minute or two; beat in the vanilla. 
  3. Reduce the mixer speed to low and steadily add the flour mixture, mixing only until it has been incorporated — because this dough is best when worked least, you might want to stop the mixer before all the flour is thoroughly blended into the dough and finish the job with a rubber spatula. When mixed, the dough will be soft, creamy and malleable.
  4. Divide the dough in half. Shape each half into a disk and wrap in plastic.Chill the dough for at least 2 hours. 
  5. Preheat the oven to 350 degrees F/180C. Line two baking sheets with parchment paper
  6. Working with one packet of dough at a time, roll out the dough between sheets of plastic wrap or wax paper to a thickness of 1/4 inch.
  7. Cut the cookies with a cookie cutter and place them on the baking sheet 1 and 1/2 inch apart. If you feel butter s melting, chill it for some time.
  8. Sprinkle colored sugar just before you place the cookies in oven.
  9. Bake the cookies one sheet at a time for 9 to 11 minutes, rotating the sheet at the midpoint. The cookies should feel firm, but they should not color much, if at all.
  10. Let them rest for 1 minute before carefully lifting them onto a rack to cool to room temperature.
  11. Repeat with the remaining dough, cooling the baking sheets between batches.

Storing: The cookies will keep at room temperature in a tin for up to 1 week. Wrapped well, they can be frozen for up to 2 months.


Related Posts Plugin for WordPress, Blogger...
Blogging tips