December 23, 2011

A Special Cake for the Special Man - Tuxedo Cake


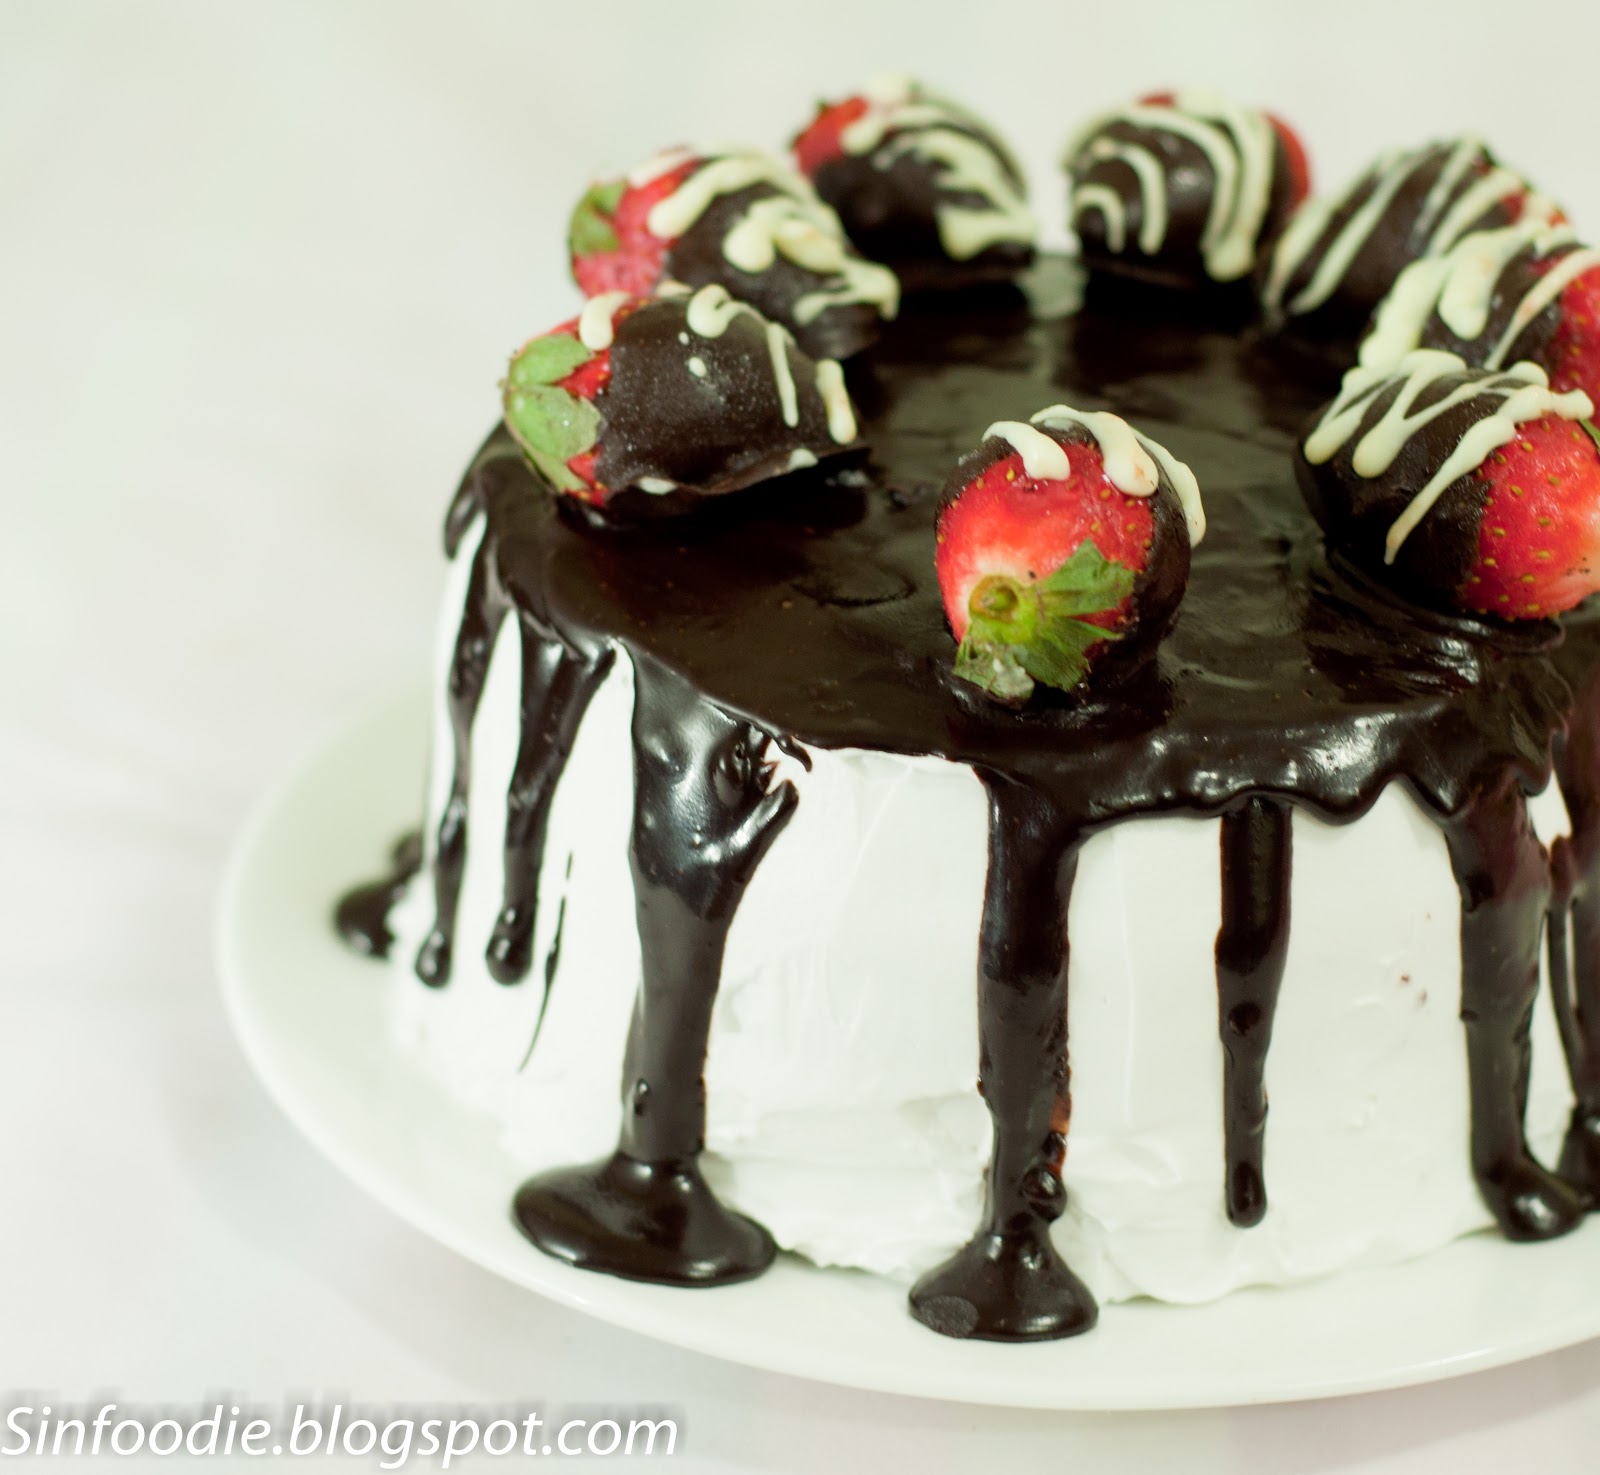
I  drool every time I look at this gorgeous cake  which I made last week, a special cake for the special man's birthday !! I get very few occasions to bake a celebration cake and usually I spend a lot of time searching and finalizing the cake to bake. I don't know how I came across this one, but one look and it was decided. With so little experience in baking cakes, I was not sure If I could replicate it exactly, But I am really proud the way it has turned out. Quite Close !!  I was working with the whipped cream too for the first time, so the fear was manifold. The whipping did give me lot of troubles, muscle aches, and the quantity went wrong and I had plenty of whipped cream left, but no complains after the way it looked and tasted :-)  Since the birthday was falling on a week day, I planned to make it over two days. The first day I made the cake, and the 2nd day I did the whipping and assembling.

By the way hidden besides all this whiteness is 4 layers of moist dark chocolate cake. And is called a Tuxedo Cake.

I am sharing the original recipe here though I made it by halving it. That gave me two 6" cakes, which I sliced into four , making it a 4 layered cake. As I mentioned above the quantity of whipped cream didn't work for me. I had halved the recipe for it too, but plenty was left, so I think 1/4th would have been enough . I also didn't have the corn syrup, so I made the ganache which I have earlier used in Bundt Cake.
I am also sharing the chocolate dipped strawberries recipe.

Ingredients:


For the cake:
1 cup (2 sticks) unsalted butter
2 cups water
1 cup canola oil
4 cups sugar
1 cup unsweetened cocoa powder
4 cups all-purpose flour
4 large eggs
1 cup buttermilk
1 tbsp. baking soda
½ tsp. salt
1 tbsp. vanilla extract

For the frosting:
4 cups chilled heavy whipping cream
1¼ cups confectioners' sugar, sifted


For the Chocolate Strawberries:
10 even sized strawberries, washed and pat dried
3 oz. dark chocolate, finely chopped
some white chocolate


For the chocolate glaze:
4 oz. bittersweet chocolate, finely chopped
½ cup heavy whipping cream
¼ cup light corn syrup
2 tsp. vanilla extract

Preparation


For the Cake

  1. Preheat the oven to 350˚ F.  Line three 9-inch round cake pans (or two 10-inch round cake pans) with parchment paper.  Butter and flour the inside edges of the pan, shaking out the excess flour.  
  2. In a saucepan over medium heat, combine the butter, water and canola oil; heat until the butter is melted
  3. In a large mixing bowl, combine the sugar, cocoa powder, and flour; whisk to blend.
  4. Pour the melted butter mixture into the dry ingredients and whisk until smooth.
  5. Whisk in the eggs one at a time, then whisk in the buttermilk.  Add the baking soda, salt and vanilla to the bowl and whisk just until incorporated.
  6.  Divide the batter evenly between the prepared pans.  Bake for 35-40 minutes or until a toothpick inserted in the center comes out clean.
  7. Let cool in the pans for 15 minutes.  Run a knife around the edge of each cake layer and invert onto a wire cooling rack.  Allow the cake layers to cool completely before frosting, at least 2 hours.

For the frosting

  1.  Ensure that the bowl and the whisk of the electric mixer are chilled. This is for ensure the cream whips well.
  2. Add the heavy cream to the bowl of an electric mixer fitted with a whisk attachment.  Whip on medium-high speed until soft peaks form.  Add the powdered sugar and continue to whip until thoroughly combined and stiff peaks form.  Be careful not to over-beat!

Assembling the cake
  1. Place one cake layer on a cake platter and spread a layer of the whipped cream frosting over the top.  Top with a second cake layer, more frosting (and the third cake layer, if using).  Frost the top and sides of the assembled cake.  Refrigerate until the frosting has stabilized, at least 1 hour.
For the Chocolate Strawberries:
  1. Line a baking sheet with parchment paper. 
  2. Melt the dark chocolate and stir it smooth. 
  3. Hold the strawberries by stem and twist and swirl it in the melted chocolate.Take it out ,swirl and let excess chocolate drip. Place it on the parchment paper and refrigerate for 10-15 minutes for the chocolate to set
  4. When the chocolate strawberries is set, melt white chocolate in a bowl. Put it in a piping bag. Cut the tip and make patterns over the strawberries
For the chocolate glaze:

  1. Place the chocolate in a medium bowl.
  2. Heat the cream in a small saucepan over medium heat until simmering.  Pour the hot cream over the chocolate and let sit 1-2 minutes.
  3. Whisk until the mixture is smooth and homogeneous.  Blend in the corn syrup and vanilla.  Pour the glaze into a pitcher or measuring cup and let cool for 10 minutes.  (Do not let the glaze cool longer or it may become difficult to pour over the cake.)  
  4. Slowly pour the glaze over the cake, ensuring that the top is covered and the glaze drips over the sides.
  5. Place the chocolate dipped strawberries on the glaze immediately
  6. Refrigerate the cake until the glaze is set and the whipped cream frosting is firm, at least 1 hour.  
  7. For Serving Slice with a long, sharp knife, wiping the blade clean between slices.  
The Recipe is from Pastry Queen and Annie Eats. The chocolate strawberries is from numerous resources available on the web.


December 6, 2011

Coconut Pistachio Laddus


 No excuses for being invisible for so long on the blog. You know me and my frequent  absenteeism due to laziness well now :))  I had made these coconut laddus for Diwali.  It is a fairly simple recipe and very delicious. I anyway love coconut sweets and had been wanting to make them  and was very ecstatic when everyone who had them loved it.
I made two versions. The second photo is the one which is light pink [not peach] in colour. The 2nd photo doesn't look great in comparison with the first photo ,but it looked better than the first to the naked eyes. The only difference is the amount of beetroot used. For the first one I used an entire medium beetroot. And for the 2nd one ,I used half the beetroot.Now coming to the recipe, It is adapted from Alpana's blog.


Ingredients:
[For 15 laddus]

For The Pistachio Filling :
1/2 cup blanched, deskinned and coarsely ground Pistachios
1 tablespoon Sweetened condensed milk
Pinch of cardamom powder


For Coconut balls
1 cup desiccated coconut  + 1/2 cup for rolling the ladoos
200 Grams sweetened condensed milk ,half tin
1 cup Milk 
1 tsp Ghee/ Clarified butter
1 tsp cardamom powder
3-4 slices of fresh medium Beetroot [ light pink] or 1 medium beetroot [dark pink]


Preparation


For the Pistachio Filling:

  1. Mix  all ingredients under the Pistachio filling to make a dough. Make 15 small balls and keep aside.


For the Coconut Balls:

  1. Heat 1 tsp of ghee in a heavy bottomed pan. Add the desiccated coconut and stir for 2-3 minutes till the time you can smell the fragrance of the coconut. 
  2. Add milk & beetroot slices and stir till the milk is all absorbed in the coconut.
  3. Add condensed milk & cardamom powder & stir continuously on low heat till the mixture starts to leave the sides of the pan . 
  4. Switch off the heat  as soon as the mixture leaves the sides of the pan. Let this mixture cool for 10-15 minutes .  
  5. Remove the beetroot slices and mix well so that color is evenly spread. When the mixture cools off divide 15 equal portions . 
  6. Flatten each Coconut ball in your palms. Place one pistachio ball into the center and close it from all sides and shape it into round balls. 
  7. Take the 1/2 cup dry desiccated coconut and roll these balls in it .
  8. Refrigerate it before serving as they taste best after it. You can store them in refrigerator for 1 week.


October 20, 2011

Makhane ki kheer /Foxnut Seeds Pudding


Makhane ki Kheer is another variety of Indian kheer/Pudding. It is fairly popular and is usually made during fasting as Makhana is considered as an auspicious ingredient in offerings to the Lord during festivals.

Makhana/Foxnut seeds is often called as Lotus seeds. I am not sure whether it is correct as Wiki says that Makhana is from water lily and not  Lotus.  A less known fact is that around 90% of the world's total Makhana production comes from Bihar.[reference]


Ingredients
[For 3 people]

50 gms Makhana /Foxnut Seeds
2 tsp Ghee /Clarified Butter
1 litre milk [ I use toned]
2-4 tbsp Sugar  [  I like my kheer less sweet, had added only 2tbsp]
Kesar/Saffron, few strands
3 cardamom, powdered
1  & 1/2 tbsp charoli/chironji
1 tbsp chopped pistcachios
Pistachios/ Almonds for garnishing

Preparation

  1. Heat the ghee in a pan  and saute Makahanas for 4-5 minutes till they are crisp. Keep aside and once it is cool enough, crush them coarsely.
  2. Soak saffron strands  in 1 tbsp warm milk
  3. Heat milk in a heavy bottomed pan. Add saffron milk and boil the milk on low heat till it reduces to almost half the amount. Keep stirring in between to prevent burning.
  4. Add the crushed makhanas and simmer for about 10-15 minutes on low heat. The milk should be thick  and runny, and not dried. You can reduce the simmer time, if you feel that the milk is drying up.
  5. Add the charoli/chironji ,sugar,cardamom powder and pistachio and mix well. Keep on heat for 2-3 minutes more.
  6. Remove from heat, and garnish with the pistachios, almonds and serve it cooled.

October 18, 2011

Something for Diwali - Moong Dal Ladoo


It is Diwali time, and I should be making sweets. But, I don't know what has got into me, suddenly I don't feel like having anything sweet. Must be due to eating excess of gond  ladoos that a relative brought few weeks back.  My brother who is in town for couple of months, has an equally sweet tooth as mine,maybe a bit more. So, I thought of making these quickfix ladoos for him. Looking at how easy and quick they are to make , I  will make them again for Diwali.  It must have been decades since I tried binding the ladoos . Had forgotten how difficult it is to deal with the warm mixture :-) Anyone, any suggestions  for reducing the burning in hands?

Ingredients

The recipe is from here
(makes 12 ,size as in the photo)
1 cup yellow moong dal (split green gram-husk removed)
3/4 cup sugar , powdered ( it was a bit sweet, can reduce few tbsp)
3-4 cardamoms, peeled and powdered
8-10 chopped cashews,
10-12 tsp ghee/clarified butter

Preparation

  1. Toast moong dal in a wide pan on low heat till it has a uniform reddish brown color. Remove from heat and spread on a plate to cool.
  2. Heat a teaspoon of ghee and saute cashews until light brown. Keep aside.
  3. When the moong dal cools, grind it to a fine powder and mix with cashews, sugar and cardamom powder.
  4. Heat about ten teaspoons of ghee in a wide pan. Add dal/sugar mixture and stir until well combined. 
  5. Remove from heat and shape into lemon sized balls when the mixture is still warm.
  6. In case the mixture cannot be easily shaped. ,add teaspoons of hot ghee gradually.


October 17, 2011

A day at MasterChef India Kitchen

Photo Courtesy : via @starplus_indya
 
When Indiblogger announced it's blogger meet at the MasterChef India Kitchen, I was one of the first ones to register. Which food blogger in right mind would miss such an opportunity. I have always been wary of going to the actual Masterchef auditions, though my friends keep encouraging me and they have more belief in me than I have in myself :) .
This meet at the Masterchef Kitchen was something I didn't need to fear . I didn't know what to expect and when my husband asked me if he could pick me up in the evening from the venue, I told him most probably I would leave midway,so he didn't need to come. And how wrong I was !! Just as I entered the sets, I had a huge smile, I was so happy to be there and at the same time repenting why I didn't bring a camera.  I had to do with my cellphone camera, so the photo quality is going to be bad :-( . The few good photos I have borrowed from @starplus_indya tweets. 

The event began with blogger introductions.There were bloggers from all fields , the geeks and the techies, personal ,fashion, photography and ofcourse few food bloggers too. 
Photo Courtesy : via @starplus_indya
Then it was time for Masterchef Judges introduction. We are already familiar with Chef Ajay Chopra and Kunal Kapoor , who were the judges in the last season too. I was eagerly waiting for Chef Vikas Khanna , I had read many tweets gushing about his good looks.  But more than good looks, I was surprised to find how humble and down to earth he was, and he has such a cute punjabi accented Hindi :-). His restaurant Junoon has recently won a Michelin Star . During a group interaction, I was even more impressed when he told us that he was opening his next restaurant in Bodhgaya in Bihar [my home state]  due to spiritual reasons . It didn't make sense initially.Only later , did I come to know about his series of documentaries Holy Kitchens about his journey to discover the spiritual foods in the World's Holy Kitchens.


 Here are some photos from the event. 

 MasterChef Kitchen with the Clock always hanging on the head


The Plates and Cutlery Section  : A food blogger only knows the values of these.

Photo Courtesy : via @starplus_indya


Masterchef's table and the oven I  . I wish I had this oven !

The judges tasting section


The mystery box. The bloggers had to conceptualize a recipe  based on the mystery ingredients in 1 minute. By the time I reached my table back after looking at the ingredients, that one minute was already over  so I could only write 2 lines  :D 

Before beginning the skills challenge,Chef Ajay Chopra giving a Masterclass : How to dice a perfect 1cm*1cm apple square. Chef Kunal Kapoor showed us how to cut ginger julienne . And Chef Vikas Khanna showed us how to cut potatoes for french fries.


Few lucky bloggers got a chance to participate in the skills challenge. The winner got Rs 5K shopperstop voucher. And there was one lucky blogger who got 10K as his french fries were perfect!

And that was not the end of it. Each blogger got a masterchef apron.I got one more for being a food blogger. masterchef thermal mugs, and an indiblogger t-shirt! I made few friends , Sharmila, a personal blogger, Sindhi Rasoi, a food blogger and Mariam Dholkawala, a tech blogger. Sharmila was very kind to drop me off midway and I almost told her all my history & geography in the very first meeting which  is very unusual of me :) :)

It was a lifetime experience and thanks to Indiblogger team to give us this opportunity .Kudos to the Indiblogger team for organizing such an outstanding event.

October 16, 2011

eBook - 100 Yummy Diwali Recipes is Available for Free Download Now


The E-Book by IndusLadies for 100 Diwali Recipes is available for Free Download. My Pistachio and White Chocolate Burfi has made it to the E-book. It is on Pg 109.
You can dowload the free e-book from here.

Have a sweet Diwali !!

October 11, 2011

BBC GoodFood India Launch and a Chance to Win a trip to Italy


The good news for all food lovers in India is that BBC GoodFood is launching their Indian edition on 22nd October 2011. BBC GoodFood is a magazine internationally famous for its devotion to fine dining.
The magazine comes with great recipes for home cooking, and entertaining. Their triple-tested handpicked recipes make the magazine a must have for every kitchen. Each recipe is also paired with great food photos. Each issue also reveals culinary secrets from Internationally renowned chefs., BBC GoodFood India also comes packed with restaurant reviews and news on India’s dining scene. For the globe-trotting food-lover, they have recommendations for eating well across the world.

As India’s first international food magazine, BBC GoodFood have introduced the GoodFood survey to decode how India eats. TheGoodFood survey has been at the forefront of gauging the dining habits of food-lovers around the world, and is now keen to replicate the same in India.

The survey comes with the promise of great rewards – one lucky participant stands to win a culinary holiday to the Fontanafredda vineyards in Italy. Other prizes include a gift pack containing a voucher for two for a great dining experience at any of three fabulous restaurants in Mumbai, Delhi and Bangalore - Olive Bar & Kitchen, Manchester United Café and Aromas of China.


Don't miss the chance to win these awards. Take the survey at http://goodfoodsurvey.in
And Get ready to get your first copy of the Indian edition this October !
To know more about BBC GoodFood and the GoodFood survey please visit:
http://www.bbcgoodfood.com
http://www.facebook.com/BBCGoodFoodIndia
http://goodfoodsurvey.in


October 6, 2011

100 Yummy Diwali Sweets Recipes - Ebook By Indus Ladies

Indusladies.com is the largest online community for Indian Women.It has verious forums and communities about family and relationships, marraiage and spouses,kitchen and household, beauty and fashion, health, diet and fitness etc.
 
For the upcoming Diwali on October 26th, 2011, Indusladies are compiling an E-Book called “100 Yummy Diwali Sweet Recipes”. They are collecting sweet/dessert recipes from various bloggers to be featured in this E-Book.   You can submit your blogpost too before Oct 8th. The details are here on 100 Yummy Diwali Sweet Recipes


I am sending my Pistachio and White Chocolate Burfi Recipe for the E-Book.


If you are interested in making some other Indian sweets from my blog, here are some of them.

Lauki Halwa 


Parwal ki mithai


Cream Chop


September 30, 2011

Sugar Cookies for someone special


This was my first attempt at sugar cookies, and first attempt at decorating them too..and tasting them too. :-) I have learned how common they are in other parts of world, now that I have started baking so frequently. This was the second kind of cookie that I parceled to my friend, chosen again due to its crispiness and ability to last longer. The recipe was again from Dorie Greenspan's Baking: From my home to yours" and this time I faced more troubles than with Chocolate almond biscotti. But this time the fault was mine. I had halved the recipe and assumed that the small size eggs will be half of the "large sized eggs". The dough became unmanageable because of that. But thankfully it didn't impact the taste or texture. The only thing I had to do was to refrigerate for more than 2 hours, so that i could work with the dough.
I decorated the cookies with home-colored  sugar, which gives it a nice crunch. For next time, I am thinking of adding either spices or citrus zest to give them some additional flavour.

Here is the original recipe from the book.

Ingredients
2 cups all-purpose flour
1/2 teaspoon salt
1/2 teaspoon baking powder
1 stick plus 2 tablespoons (10 tablespoons) unsalted butter, at room temperature
1 cup sugar
1 large egg
1 large egg yolk
1 teaspoon pure vanilla extract

Colored sugar/cinnamon sugar [optional]

  Preparation
  1. Whisk the flour, salt and baking powder together.
  2. Working with  mixer, beat the butter at medium speed for a minute or so, until smooth. Beat in the sugar and continue to beat for about 2 minutes, until the mixture is light and pale. Add the egg and yolk and beat for another minute or two; beat in the vanilla. 
  3. Reduce the mixer speed to low and steadily add the flour mixture, mixing only until it has been incorporated — because this dough is best when worked least, you might want to stop the mixer before all the flour is thoroughly blended into the dough and finish the job with a rubber spatula. When mixed, the dough will be soft, creamy and malleable.
  4. Divide the dough in half. Shape each half into a disk and wrap in plastic.Chill the dough for at least 2 hours. 
  5. Preheat the oven to 350 degrees F/180C. Line two baking sheets with parchment paper
  6. Working with one packet of dough at a time, roll out the dough between sheets of plastic wrap or wax paper to a thickness of 1/4 inch.
  7. Cut the cookies with a cookie cutter and place them on the baking sheet 1 and 1/2 inch apart. If you feel butter s melting, chill it for some time.
  8. Sprinkle colored sugar just before you place the cookies in oven.
  9. Bake the cookies one sheet at a time for 9 to 11 minutes, rotating the sheet at the midpoint. The cookies should feel firm, but they should not color much, if at all.
  10. Let them rest for 1 minute before carefully lifting them onto a rack to cool to room temperature.
  11. Repeat with the remaining dough, cooling the baking sheets between batches.

Storing: The cookies will keep at room temperature in a tin for up to 1 week. Wrapped well, they can be frozen for up to 2 months.


September 28, 2011

Chocolate Almond Biscotti


Biscotti are twice baked cakes, which are crispy and crunchy and can last for a longer time as they become dry due to baking it twice. I was exactly looking for something like this ,which could last longer, as for the first time I was parceling them to another city, to a friend.
It was about time i made something from the Dorie Greenspan's book which I had gifted to myself for my birthday few month's back :) For any baking , I usually go to the internet for reference. It makes me easier to follow a recipe which has review comments and suggestions incase someone faces a problem. This time , I didn't. Later on ,while slicing the biscotti after first bake , I faced an issue as it was crumbling. I think I almost had 1/3rd of them broken. I searched if others faced the same issue with the recipe and someone did face the same. That apart, these are delicious. My husband who is not so much a sweets person, is munching on the broken ones, while the good ones were packed and sent :)


Ingredients
[about 40 cookies]
2 cups all-purpose flour
1/2 cup unsweetened cocoa powder
2 tbsp instant coffee or instant espresso powder
3/4 tsp baking soda
1/2 tsp baking powder
1 tsp salt
6 tbsp unsalted butter, room temperature
1 cup sugar
2 large eggs, lightly beaten
1 tsp vanilla extract
1/2 cup chopped  roasted almonds 
4 oz bittersweet chocolate, coarsely chopped ( or 3/4 cup mini chocolate chips)
Sugar, for dusting
Preparation
  1. Preheat oven to 350 F/176 C. Line a baking sheet with parchment paper.
  2. Sift together the flour, cocoa, coffee powder, baking soda, baking powder, and salt.
  3. With a mixer, cream the butter and sugar on medium speed for about 2 minutes until pale.
  4. Scrape down the sides of the bowl and add the eggs and vanilla; beat for another 2 minutes.
  5. Decrease the speed to low and mix in the dry ingredients in 3 additions, mixing only until a dough forms. 
  6. Scrape down the sides of the bowl and mix in the chopped nuts and chocolate chunks/chips.
  7. Turn the dough out onto a work surface and knead a few times just to incorporate any dry ingredients that didn't get mixed in before. 
  8. Divide into two portions ,shape each portion into a 12 x 2 inch log and 1/2 to 1 inch high. 
  9. Place them on baking sheet,sprinkle the tops with a little sugar.
  10. Bake for 25 minutes till they are slightly firm.Logs will spread and crack which is fine.
  11. Remove the sheet from the oven and let it cool on a rack for 20 minutes. Then, with a very sharp, serrated knife, slice the logs into about 3/4 - 1 inch slices and leave the slices standing up on the baking sheet 
  12. Return to the oven for another 10-15 minutes of baking.
  13. Transfer biscotti to a rack to cool.


Linking it to Almond Event at Anu's healthy kitchen and cookeatdelicious

September 22, 2011

Frozen Chocolate Bananas


I have always wanted to make Chocolate Frozen Bananas when I first saw them. It was something very new for me and was surprised that it is even packaged and sold in shops abroad, just like ice creams. I have come closer to make them many times in past, but every time, by the time  I came out of laziness, the bananas would become overripe. Thankfully, not this time.  
I had also been wanting to try making colored sugar,which I did last night , to sprinkle it over the chocolate covered bananas. The sugar looked really nice, but when sprinkled over chocolate, most of it was sucked inside. The chocolate over the bananas freezes super fast, within seconds, so , in this case colored sugar was not a good idea. The other toppings I tried, was chocolate sprinkles and roasted almonds. I haven't yet tasted the chocolate sprinkles one, but the roasted almonds is super duper awesome. I would suggest everyone to try that. You can make them in different sizes , by cutting them accordingly. Having made them in smaller bite size too, I prefer the smaller version for ease of popping :)

Adapted from Epicurious.com
Ingredients
2 Ripe but firm bananas
6 oz dark chocolate
2 tbsp olive oil
1/2 cup roasted almonds, chopped
Preparation
  1. Line a baking sheet or a plate with wax paper/parchment paper.
  2. Cut the bananas in halves, or as per your wish. I also cut the tip of the bananas at both the ends. For bigger size bananas, insert an ice cream stick ,for smaller ones, you can use toothpicks. Place them on the baking sheet.
  3. Freeze them uncovered from minimum 15 minutes. I read people freezing for more than that,overnight too. So, I increased the freezing time to 1 hour. It is important to keep them uncovered.
  4. When the bananas are about to complete their freezing time,  start the preparation for chocolate coating.
  5. Melt the chocolate with the oil  in the microwave  at 30 sec interval or in a half-full pan of simmering water (about 2 minutes). Stir until smooth.  
  6. Take the bananas out of freezer and working quickly dip each banana piece in the chocolate, and quickly sprinkle with your topping . This has to be done very quickly as chocolate sets within seconds.
  7.  The frozen bananas are ready to eat, right away. You can store them for 1 week, covered , in the freezer. If it is stored frozen, before serving, take out from freezer and keep in refrigerator for 20-30 minutes.

    I loved how the roasted almonds came out, so sharing the way I did too here. It is more for my reference when I do them again. :)

    How to roast Almonds in oven
    1. Preheat oven at 170C.
    2. Spread 1/4 cup almonds on an aluminum baking dish . Each almond should be spread evenly.
    3. Bake them for 18 minutes, turning them over at every 6 minutes.


Linking it to Almond Event at Anu's healthy kitchen and cookeatdelicious

September 19, 2011

Chocolate Truffles


I had some leftover chocolate ganache which I wanted to reuse . I had seen chocolate truffles on many blogs earlier, so that was the first thing that came to my mind. Truffles  are named as they resemble the truffle fungus and the cocoa coated truffles is the traditional way of making them to resemble the dirt on the fungus truffle. I had  initially thought of doing it the non traditional way, coating with melted chocolate and making some beautiful designs. I had my brother and his friend over at home, so to make something sweet and quick , I went ahead with cocoa coating. The first bite was unimaginably bitter, I had never tasted so much of cocoa and was a bit naive to expect something else instead of bitterness. However subsequent bites was into the chocolate heaven. Good quality chocolate needs to be used for truffles, and you can add flavours ,spices like cinnamon and  nuts of your choice too.
Since I had reused the ganache which was already referigerated , it was quick for me. But if you are doing it for scratch, you would need to wait for few hours for the ganache to become firm enough to form into balls.

Ingredients
For 30-40 truffles
Ganache
1 cup or  8 oz of semi-sweet or bittersweet chocolate , chopped
1/2 cup of heavy cream
You can add any of these flavours to the ganache
Cinnamon and cardamon
Almond extract
Coffee/espresso powder
Citrus zest [ lemon/orange
 You can add any of these Truffles Coatings
Cocoa powder
Finely chopped roasted nuts walnuts/almonds/hazelnuts
White or dark melted chocolate coating
Toasted grated cocout
Chocolate shavings

Preparation
  1. In a small, heavy saucepan bring the cream to a  boil.
  2. Stir in any of the flavors that you want.
  3. If the chocolate is too hard, melt it in microwave. Pour the cream over the chocolate and allow to stand for a few minutes then stir until smooth. This is called Ganache.
  4. Let it cool and then refrigerate it for two hours.
  5. Once it is firm enough, scoop out 1 tbsp of firmed ganache ,roll it into balls with your hands. and immediately roll them over the coating of your choice. 
  6. Place it on a parchment paper and refrigerate till you are ready to serve.


September 11, 2011

Hazelnut Nutella Thumbprint Cookies


I am guilty of lying low in the blogword these days, not posting anything, not visiting any of the fellow bloggers blogs that frequently.Mumbai  monsoon continues. It has been raining everyday, leaving a sense of melancholy on weekdays and to add to that office hours have been hectic, leaving me uninspired to cook anything special. The only good thing is when we go out on weekends, to explore the beauty that monsoon brings.
Here are some of the photos  from our recent trip to Matheran, a beautiful hill station near mumbai, where no vehicles are allowed. There are no concrete or tar roads. You have to go from a place either on foot or horses. The photos are taken by my husband, who is an amateur photographer.  
Enjoy the photos of greenery and rains :))

My sister was here for a couple of days. She had made of list of few things for me to bake. Unfortunately, due to lack of time I  couldn't  make anything. To make up for that I baked some of these thumbprint cookies that she could take home.  The baking time that the original recipe had did not work for me , maybe because I use a microwave convection oven. It was too crumbly and was breaking even if I tried to lift them. I increased the baking time considerably to get a harder texture. The cookies came out delicious and exactly of the same texture I wanted.  
The recipe is from BakersDaughter .OMG, You can imagine how much office work is on my mind. I was going to write ," Please find the recipe attached" . :-D


Ingredients
 [25-30 cookies]
12 tbsp butter, softened
1/2 cup powdered sugar
1 tsp vanilla extract
1 1/4 cups all purpose flour
1/2 cup Nutella
1 cup hazelnuts toasted

Preparation
  1. Preheat your oven to 350F/180C.  Line 2 baking trays with parchment paper.  
  2. Finely chop the hazelnuts.  Set aside. 
  3. Using a hand or stand mixer, combine the butter and sugar.  Beat for a few minutes until smooth. 
  4. Add the flour,vanilla extract and mix until combined.   
  5. Form the dough into tablespoon sized balls.  Roll each ball into the chopped nuts and place on the baking trays 1 inch apart.
  6. Bake for 10 minutes, remove from the oven and press a round teaspoon into the center into each cookie to make an indentation. If you can bear a bit of heat, you can use your thumb ,like I did :)
  7.  Using a pastry bag,fill in nutella in the indentation. The original recipe had this step once the cookies were completely baked. But , I wanted to harden Nutella a bit  as I was packing them, so I did this step before.The first photo above is after this step.
  8. Place back the cookies in the oven for another 20-25 minutes  till they are slightly brown [ The original recipe had 7-10 minutes or until the edges of the cookies are lightly browned.  ]
  9. Place the cookies on a wire rack to cool.

August 15, 2011

Cream Chop / Malai Chop, Raksha Bandhan Celebrations and BlogAdda Notable Newbie Award


The seasons of Indian festivals have started, beginning with Raksha Bandhan. It is day to celebrate the bond between brothers and sisters. It was a big day for us during our childhood days, when  all of us siblings were still  living together. Having grown up in a small town which didn't have an English medium school after 10th, we had to leave the town one by one as we passed our 10th class , for further studies. It became increasingly difficult to gather together on the Raksha bandhan day and now we just manage to celebrate the day by sending rakhis to our brother by post. Anyway to mark this special day, I wanted to make an Indian sweet. 

And I have another big reason to celebrate too . Last Week BlogAdda annouced the notable newbies for the month, And my blog was also conferred this award. Thanks a lot to the BlogAdda team for giving my blog this recognition.


This mithai / Indian sweet is easily available in sweet shops , but I wanted to give it a different shape and look ,so decided to make it at home. In my town it was called  Cream Chop / Malai Chop . I don't know what it is called at other places , but it is from the same family of chum chum  and Rasgullas . Their Sibling :))

Usually this sweet is a round or rectangular shape. The sweet is sliced into two and filled with sweetened reduced milk / Rabdi .Since I wanted to make a flower shape, I thought slicing would be difficult, so I made them thinner. This way, I could put two pieces together instead of slicing one.

Ingredients
[For 6 -8 sweets]

For Homemade Paneer
1 litre whole milk [about 5 cups]
2 tsp vinegar/lemon juice

For Sugur Syrup
1 cup sugar
3 cups Water

For Malai/Rabdi

1/2 litre whole milk
 2 tbsp sugar
1/4 tsp Cardamom powder


Preparation
For Homemade Paneer
  1. Bring milk to a boil. When it comes to a boil,  add  Vinegar or lemon juice. Stir until milk  separates into curds and whey completely. Add some more vinegar/lemon juice it it doesn't seem to separate.
  2. Pour this paneer on a muslin cloth or cheesecloth lined colander. Drain all water and then wash it with cold water to remove the sourness. Gather all sides of the  muslin cloth and twist and squeeze to drain all water. Put a heavy pan on top of this wrapped paneer for an hour to drain any remaining water.
  3. After an hour, knead the paneer well to make a smooth dough for about 4 minutes. If you are making flower shape, make 12-16 small balls and flatten it and cut the shape using a cookie cutter. If you are making a round or rectangle shape, make  only 8 balls and shape them accordingly. 
For the Sugar Syrup
  1.  In a pan, bring water and sugar to boil till all the sugar dissolves. 
  2. Add the paneer balls/flowers and cover the pan with a lid and cook for 25 minutes.  The balls will get double in size. 
  3. Turn the heat off and let the balls remain in the sugar syrup for 4-5 hours.
For the Malai /Rabdi
  1. Heat milk in a wok/ kadhai . When a cream layer forms on the top, remove the layer with a spatula and spread it on to the sides of the wok. Repeat this process till  the milk reduces to 1/3rd. 
  2. Scratch the cream layer that you have collected on the sides of the wok and mix in with the reduced milk. You can add some food colour if you wish.
  3. Add sugar little by little and when it is sweet enough for your taste stop, and add cardamom powder . Stir for a minute or two and turn off the heat. Let it cool and then refrigerate it.
Assembling
  When the paneer balls are ready after having been in the syrup for several hours, take it out from syrup and slice it horizontally. Fill in the malai /rabdi between the two slices of the paneer balls/flowers.Refrigerate for at least an hour before serving. Garnish with chopped pistachios/


July 7, 2011

Perfect Pound Cake


My husband who is not a big fan of sweets as I am, loves pound cakes. In fact, when I had started baking frequently few months back, it was the only thing he requested me to make. It was a big surprise as in matters of cakes, he only eats to taste it. So when the Sweet Punch for July was announced to make Perfect Pound Cakes, I was excited . It is my first bake as a Sweet Punch participant.
The term Pound cake was coined as it was traditionally made of one pound each of the 4 ingredients, flour,eggs,butter and sugar . However the recipe that the Sweet Punch chose was a different method. The recipe is from Cake Bible.  It is called Perfect Pound Cake and indeed it is perfect and addictive.  

 I have done a slight modification to the recipe. I added some lemon zest and "tried" to make a white chocolate and lemon glaze. "Tried" as I burnt half of whatever little white chocolate I had. 


Ingredients:
3 tbsp Milk
3 large Eggs
1 and 1/2 tsp vanilla extract
and 1/2 cups cake flour (150gm) 
3/4cup sugar
3/4 teaspoon baking powder
 zest of 1 lemon

1/4 teaspoon salt
13 Tablespoons unsalted butter, softened (184 gms)

Preparation

  1. Preheat your oven to 350 F/175C. 
  2. Butter an 8 inch by 4 by 2.5 inch loaf pan, or any six cup loaf or fluted tube pan.  
  3. Lightly whisk together milk, eggs and vanilla in a medium bowl.
  4. Place dry ingredients in a large bowl and mix on low speed for 30 seconds, until blended. 
  5. Add the butter , lemon zest and half the egg mixture, and mix until dry ingredients are moistened. On medium speed, beat for one minute. This will aerate and develop the cake’s structure. Scrape down sides.
  6. Add the remaining egg mixture in two batches, beating for 20 seconds between each addition. Scrape down sides.
  7. Pour batter into prepared pan. Smooth surface with a spatula. 
  8. Bake for 55-65 minutes (35-45 minutes if baking in a fluted tube pan), until a wooden toothpick inserted into the center comes out clean. Let cake cool on a rack in the pan for 10 minuets before inverting onto a greased wire rack. If using a loaf pan, flip the cake over so the top is up.
For making cake flour at home - Take one cup of all purpose flour and remove 2 tbsp from it.Replace the 2 tbsp flour with cornflour and sift together 2-3 times. Cake flour is ready to use.

July 3, 2011

Cups of Sunshine - Chocolate and Carrots

You can not only lick these cups but EAT it too as it is made of chocolate


What should I say about this !! This is as delicious as it looks. I have been wanting to make chocolate cups for sometime but didn't want to fill it with usual icecream or fruits filling. I thought why not to Indianise it and serve it with something Indian. So here it is , a fusion of the great Indian Carrot dessert  gajar halwa and chocolates.I had the visual in mind , which looked very very attractive and thankfully it tasted extremely delicious too.
I had very less amount of chocolates in my pantry, so the cups were thinner. It had to be eaten immediately as the chocolate would melt very soon. So, I suggest in the recipe below to have a thicker cup.


Ingredients
[for 4-5]
For Chocolate Cups
1 cup Dark semisweet chocolate,chopped
Cupcake liners
For Carrot Stuffing
2 cups Carrot, grated
2 cups Milk
1/4 cup Sugar
a pinch Cardamom powder
7-8 Cashewnuts, halved
6-10 Raisins [optional]
1 tbsp Clarified butter/ghee
Preparation
For Chocolate Cups
  1. Line the cupcake pan with cupcake liners. If you are using thin liners use 3 liners for each to have a thicker base.
  2. Melt chocolate in top of double boiler over simmering water, stirring until smooth.  
  3. Spoon 1 tablespoon of melted chocolate into each paper liner. Brush the inside of the cupcake liners to coat evenly. Freeze until chocolate firms for about 30 minutes. 
  4. Melt the leftover chocolate again and reapply a second coat using the same method  Freeze until completely set, about 1 hour. 
  5. Once set, peel the cupcake liners.Whenever you feel that chocolate is melting, refreeze it. It can be made a day in advance and needs to be refrigerated covered.
 For Carrot Stuffing 
  1. Boil milk in a pan till it reduces to almost half. Keep stirring often so that it doesn't burn at the bottom of the pan.Keep aside. 
  2. Heat ghee in a separate pan. Roast the cashew and raisin in it and take it out and keep aside. Add grated carrots to the ghee and stir fry for 7-8 minutes. 
  3. Add milk and cook until the milk dries. When all the milk is soaked up, add sugar and cardamom powder. This will release some moisture. Cook till it dries up completely. Add raisins and cashewnuts.  Take out and when it cools, refrigerate it covered.
Assembling
Once the carrot stuffing cools, Fill the chocolate cups with it in form of heaps. Keep refrigerated until ready to serve.


Sending this to the "Veggie/Fruit of the Month - Carrot" Event by Priya and Revathi

July 2, 2011

Homemade Tortilla Chips from Scratch


Tortillas are Mexican Flatbread, made out of maize flour /Cornmeal[makai ka aata] . Maize flour should not be confused with cornflour[corn starch]. Tortilla chips are made by deep frying or baking the tortillas. This was first time for me in making or eating them, so deep frying appealed to me more. I loved them and am surely going to snack on them again, so would try the healthier bake option from next time.
I was looking for a recipe which was from scratch and I found it at Tarla Dalal. I have modified the recipe to add some additional herbs and spices for more flavour.

Ingredients
1 and 1/4 cups maize flour
3/4 cups all purpose flour
4 tsp oil
1/2 cumin seeds [optional]
1 tsp red chilli flakes
1 and 1/2 tsp oregano
1 tsp dried thyme
Salt to taste
Oil for deep frying
Water

Preparation
  1. Mix all the ingredients together and knead a  soft dough by adding warm water.
  2. Divide the dough into small lemon size portions. 
  3. Roll out each portion thinly  to a round shape. Dust with flour as you roll them . Prick all over with a fork. If it is uneven, trim the ends.
  4. Cook lightly on  both sides on a  hot griddle. Repeat with the rest of the dough.  
  5. Cut into small triangles and deep fry in oil until crisp. Drain on absorbent paper.
  6. Store in an air-tight container. 
  7. Serve with salsa or dips.

June 29, 2011

Stuffed Potatoes With Creamy Corn Filling

Stuffed Potatoes with Creamy Corn Filling
 This was another thing that I had made  the Lunch on Sunday. I am absolutely in love with the creamy corn Stuffing. It goes well with many dishes . I have previously used them in my first blog post Stuffed Pastry  and Stuffed Onions. Add some more mashed potatoes to the stuffing and it can be served on its own.
I have made these before too and it is tremendously loved. The recipe is a modified version of the recipe of Chef Sanjeev Kapoor. The changes I have made is removing the peel of the potatoes and increasing the baking time to get the golden colour.

Before  I start the recipe, Let me tell you a funny thing. I enabled the blog archive feature today, and noticed that I started the blog in Jan 23,  2011. And all this while I was thinking that it was in December.  So,I posted the 6th month anniversary post in 5 months only.!!! I seriously need some memory pills. :D


Ingredients

4 large Potatoes
2 tbsp Butter
2 tbsp All purpose flour[Maida]
1 1/2 cups Milk
1 cup Corn kernels, boiled
Salt to taste
4-5 Peppercorns, crushed
4 tablespoons Fresh cream
1/2 cup Cheese, grated [ I have used mozzarella]
2 tablespoons Fresh parsley, chopped


Preparation
  1. Preheat oven to 200º C. 
  2. Boil potatoes with skin so that it is cooked but not mushy.
  3. When cooled, remove the peel ,halve lengthwise, scoop out the potatoes leaving thick shells. Keep aside.
  4. Grate scooped out potatoes. Keep aside.
  5. For the filling, heat butter in a pan, add refined flour and roast. Add milk gradually and cook stirring continuously. Cook for two minutes stirring continuously. Add boiled corn kernels, salt, half the crushed peppercorns and stir. Add grated potatoes to the corn mixture and mix. Add fresh cream, half the grated cheese and mix again. Add chopped parsley. 
  6. Place the potato shells on a baking tray. Stuff them up with the filling. Sprinkle the remaining cheese and the remaining crushed peppercorns on the top.
  7. Bake in the preheated oven at 200º C for 15-25 minutes or till the cheese turns golden. Serve hot.


Related Posts Plugin for WordPress, Blogger...
Blogging tips